Monday, June 11, 2007

Small Workbench #6 - Complete

Well, I got the vise installed. I used red oak for the vice face for two reasons. The primary reason is that I've never installed a vice before and it was my test piece. The second reason is I liked the way it eventually worked so it graduated to my workpiece and the finished product.


A quick test drive of the system for cutting some tails and it's 100% success. The vice racks more than I hoped, but this procedure doesn't involve extreme vise pressure and a like thickness piece in the opposite end compensates for the problem.


Thanks for looking!

Thursday, June 7, 2007

Small Workbench #5 - The Apron

I have been hemming and hawing on what I was going to do to give this little bench a bit more character. It's going to serve a dual role in being both my auxillary bench for hand tool work as well as my 2 year old son's bench. In that vane, I decided to add a little detail to the apron...the shadow or inlaid dovetail. Please note: Though I prefer to do these one-off projects with handcut dovetails, the Akeda 16 was used throughout.

To start, I joined one maple board with one walnut board. The walnut will be the shadow. Mostly because I had more maple than walnut or I could have done it the other way. This piece is glued up and my impatience sets in...


After the glue dries...well, almost (more on that,) I cut the pin board off, leaving the pin slots filled with walnut.


Now, as I mentioned...the glue was almost dry when I did this. I don't realize yet, but I'm about to find out that my impatience is NOT a virtue...

I then recut the tail board revealing a 1/8" shadow of walnut. This is where I found my glue wasn't dry and and sent a chunk of walnut flying across the shop. Luckily, I glued it right back in place and still not waiting for it to dry, I supported it side and back and happily began cutting again. I don't get alot of time in the shop, so I forge on at times when it's best to go to bed. **shrug** I'm not about to change after all this time....

Here is the tail board...


Once I recut the tailboard, I then cut a pin board of maple to match my detailed tail board and the end result is the shadow dovetail.


Now, to add a complete shadow, I could have also cut a tailboard of walnut, mated it to the pinboard of maple and done the entire process to add the walnut shadow to the inside of the pin piece as well. However, as this was my first venture into this particular detail in dovetail joinery, I figured I'd take baby steps.

This process did involve more than a little hand chisel work as I made the pins proud, and for some reason the pin board fit WAY too tight into the tailboard when I joined the walnut to the maple. A few minutes spent with a nice sharp chisel and everything was a piston fit. I wasn't concerned with altering the fit of the jig, as I was only fitting the inlay, and not the final tail and pins.

I used the Domino (once I found it....more on that later as well...stay tuned for another blog series) to align the apron to the table top. It all fit. I was happy because I didn't do a dry fit to find out. I either have that much faith in the Domino, or in my vast skills. D'OH. I just didn't want to put that dovetail joint together again as they fit the best the FIRST time, not the 4th.

The camera with shadow and flash pics up some tear out that I can't appreciate with my eye, but here it is glued up, clamped, and awaiting the vise.


The next installment of this series will be the vice installation. Your guess is as good as mine as I'm trying to decide to run it the length of the table. I'm concerned about racking though so I may just run it 12". I havn't decided.

Thanks for taking a look!

Cheers!

Tuesday, June 5, 2007

Small Workbench #4 - Joining bases and putting on the top


I joined the bases with the stretchers by using dowels as anti rotation pins, and then running a bolt through the stretcher to pull everything up tight...

I added a top that is 22" x 12" of double thickness birch plywood. You can see some blade burn on both the plywood and the hard maple bases. It was a sharp blade, but I had feed rate issues.

Cutting the top. The excalibur blade guard is a real asset when cutting sheet goods for not only finger protection, but overblade dust extraction...


The top installed with 4 screws. The blade burn you see on both the base and the top was a feed rate issue. I'll sand some on the base...or not. The top will have a maple apron around it. I may work on that tonight or in the next day or so. I have a little bit of fancy detail planned for an otherwise utility piece.


I also used the Festool ES150 ROS to make the top smooth as glass. I had to be careful with the veneer, but the ES150 works so good I just used 150 grit on the top.


I'll post more of the apron detail when I work out the "Big Finish!"

Cheers!

Tuesday, May 22, 2007

Small Workbench #3 - Using Dowelmax to join the bases with stretchers

I wanted to put a bolt through the stretchers in order to tighten up an seasonal slack that might occur with this bench. The perfect thing to do, (perfect only because I thought of it,) was to use two dowels for anti-rotation pins and then put a bolt through the stretcher. This is just a short blog entry today.

This video is how I used Dowelmax to align the stretchers to the base.


In part IV of this series, I'll discuss the top of the bench, and move on to the skirt and vise installation. As I'm not exactly sure what I'm going to do for any of those, I'll just leave you with this tidbit for today.

Have a great day in the shop!

Saturday, May 19, 2007

Small Workbench #2: Using Domino to bore mortises for tressel base...

Yeehaw! I anticipated this step all day. I had originally planned to use Dowelmax to join these pieces because I was more comfy with the jig and this has to align perfect. I then though, phooey! I'll use Domino and give it a good test drive.

The first picture shows the Festool Domino fitted with the Trim stop. This fitting allows you to "center or off-set the Domino joiner on narrow work pieces for perfect positioning."


HA! If anyone can screw this up, I can! I defy a tool company to make a jig that I can't find a way to ignore the instructions and eventually misuse....

Well, as you can see in the background, I had to get the instructions out. I couldn't figure out how to put the trimstop on the Domino. After about 4 seconds of looking at a picture, banging me head into the headstock on my lathe in self disgust, I fit the trimstop on and centred the unit to the test piece that I had measured and marked, and made a test cut.

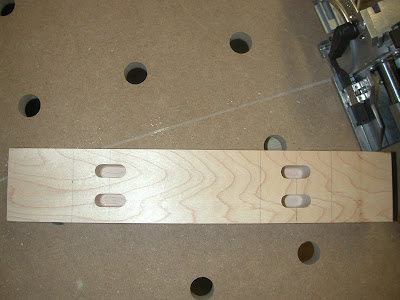
After making the first cut, I just stuffed each piece into the the trimstop and cut the remaining 15 mortises. Clarity of thought might have led me to take my time and measure each one to ensure that I was going to end up with the right alignment in the end, but trust tthe tool, I always say. Sometimes, I end up being the "tool."


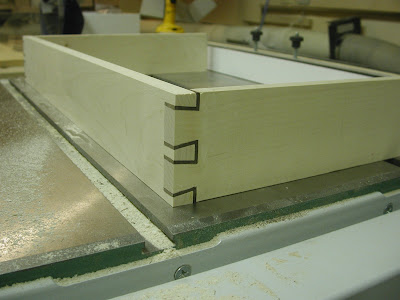
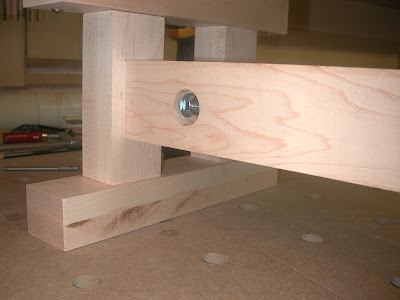
They look okay, but time will tell. There is another essential step or two to see if I can pull this off. As you can see, I decided to put two (2) dominos in each joint just to really test the limits of measurement error or success.

Now, when I went to measure and mark where I wanted the ajoining mortises on the tressel base and top, the indexing pins on the Domino were too close to the edge. I tossed on the outrigger attachment and found to my horror that I was in the "in between zone." Crap! Well, just move where you want the mortises. Right? That would be too easy. Lets find another way to index. I started thinking, "What would Dowelmax do?"

I didn't really think that, but the indexing rod for Dowelmax was sitting on the bench and I just happened to pick it up.


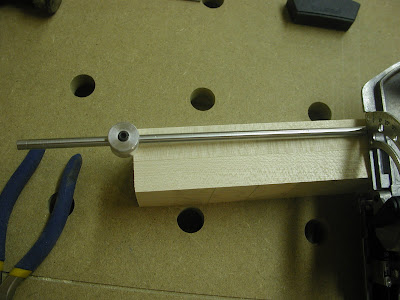
I lined up the Domino on the first cut, set the indexing rod, and proceeded to cut the remaining 15 matching mortises in the tressel base and tops. This is NOT going to fit. No way, no how. But, I press on!


Just when I must be looking like a genius to everyone reading this, my humility knows no boundries. So I have therefore included a video of me trying to use the darn indexing rod. I mean, this is really Keystone Cops stuff. In my defence, however, if I held the Domino with my right hand, and the indexing bar with my left...even with the opposite side cross-over maneuver, then this entire process goes REALLY easy...I may remember that for next time...may.


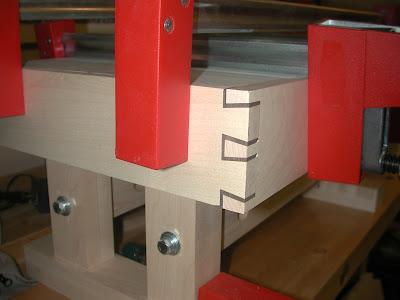
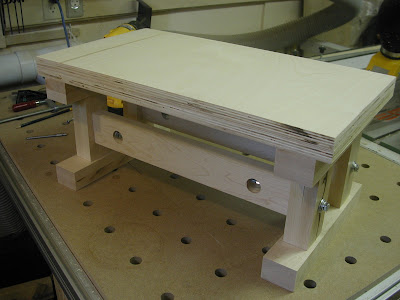
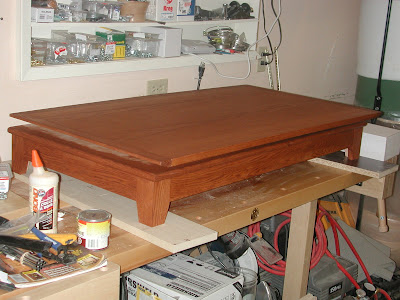
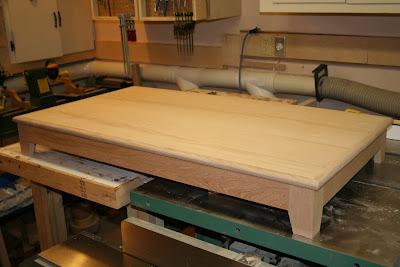
Well, they look pretty good to me. They still have to fit though. You see, back in the beginning, I forgot to mention how I had chosen to make this EVEN MORE difficult. I could have milled the tressel base and legs to exact dimensions. Then just set the fence on Domino (hereafter affectionately named, Lucille (BB King Joke).) Instead I wanted a reveal on every leg. I'm going to make this so there is not a popsicle's chance in the Bayou of working....this involved some test cuts and measuring on some scrap...it took about 20 minutes to get things setup where I thought they were pretty good.


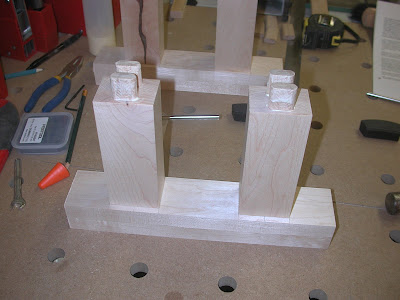
Well, so far so good, eh? (I'm Canadian)

I didn't get too excited, as anyone that has made a piece with slats or spindles knows, the big gal hasn't sung yet...I still have to lined up the ajoining piece of tressel top. I'm admittedly equally excited and nervous at this point.

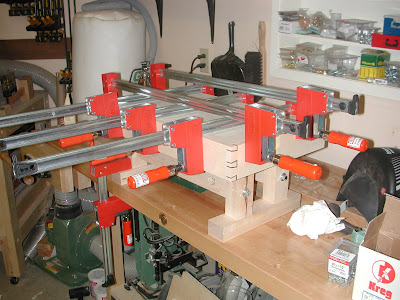
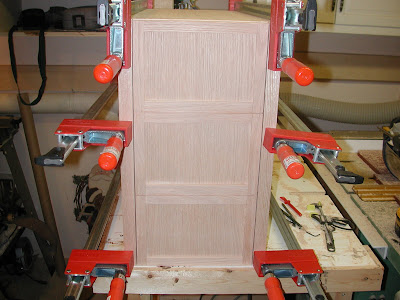
I put glue on (more than the picture shows) and drove the pieces together with my handy dandy mallet and a piece of scrap wood. This little endeavour met with a knock on the shop door and a rather annoyed look from my wife...kids sleeping...banging...all that...yada yada yada...I'm on a role...I'll fix the damage to the upper two floors in a second.


Well, nobody was as shocked as I. They both fit. I tossed a couple of K-bodies on them and left the shop for the night to tell my imaginary friends of my exploits of precision and design...or blind assed luck...depends on how well you know me!

The project forges forward!

Thursday, May 17, 2007

Small Bench


I'm about to undertake a quick little project. An auxillary bench for my main workbench. I've been learning to cut the dovetail by practicing alot and watching some Rob Cosman videos. I've found that my bench is too short to comfortably do this. This little guy will have it's tressle base made of maple, but it's top will be less fancy. I'll probably just laminate a piece of oak plywood to a hunk of MDF and put an apron around it. I originally thought that I'd laminate a maple top for it, but I didn't feel like making this thing weigh 60 lbs. Anyway, I'm going to use the Domino for joinery and should be able to start this project this week. I have some S2S maple on the rack ready to go.

I'll have construction photos and possible a short video on the bench construction. construction photo's will be on my Picasaweb Album.

Cheers!

Tool Blog Updates


I've got some new videos on my Tool Blog showing a Festool MFT 1080 as a tablesaw outfeed. I also do a brief comparison of Dowelmax vs. the Festool Domino with a quick frame joint and edge joining. If you want to watch some poorly produced videos, take a peak!

Cheers!

Friday, May 11, 2007

Video Shop Tour


Hi Folks! There is a little contest over at Lumberjocks.com for video shop tours. I thought I'd make one up. I hope you enjoy it.

Cheers!

Tuesday, May 1, 2007

Entertainment Centre - Final


Well, it's done. Almost. The door glass still hasn't been cut. I commissioned it and it was supposed to be done yesterday. **shrug** It's installed in my parents basement. As a note of humour and curiosity, I compiled a list of the tools and fixtures I used to create it. I was almost embarassed as it's certainly more than the handsaw, hammer and glue that my grandfather used to create his kitchen cabinets. Regardless, here's the tool list.

I had quite alot of fun building this project. It's about the perfect size for me to knock off in a month or so of an hour here, hour there. There are no major mistakes and the thing is built like a tank...at least I think so.

The method of constructing it in parts, finishing them, then transporting to final destination before assembly, worked really well for me. There was no nut busting piece of furniture to sweat out of the shop, and I didn't need any help getting it into my parents basement.

As always, construction pics are in my Picasa Album for this project.

Thanks for looking!

I'm going to be finishing my first impressions of some Festool tools in the next couple of weeks. Sitting down in the shop is a new Domino, TS 55 and MFT 1080. I'll give them a test drive and see how things go. That info will be in my Tool Blog.

Cheers!

Saturday, April 21, 2007

Entertainment Centre Part 4


Well, the drawer boxes, top, base, legs and aprons are all stained. I used Varathane Gel Stain. I like using it. I've had good luck with it. The color is Early American. It's a little darker than I liked, but the Honey Oak color they have looks like hell.

I'll stain the drawers when I can free up some bench space. They will be the toughest to finish because of all the detail nooks and crannies. I'll get some poly on everything, take it on site for final assembly, and then do a wipe on coat of poly once there.

I should have it off the bench and in it's new home late next week. I figure 4 nights of finishing left.

I'm anxiously awaiting my Festool order. It should arrive next week. A Domino, an MFT 1080 and a TS55. Check out my Tool Blog for info on those. Then I have to update the lathe...probably a Nova 1624-44. Anyway, back at it...

Cheers!

Thursday, April 19, 2007

Entertainment Centre Part 3


I got the face frames on the boxes, cut the false front and attached them and flush trimmed the edging tonight. The drawers are fit with their slides and I have the two ends of the apron doweled and glued. I'll head back down to the shop, tonight, and glue the long stretchers of the apron to have it complete. I'll wait until tomorrow or Saturday to attach it to the base. At that point the project is ready for the finishing room. As I stated before, I'm going to finish the components and then assemble them at my parents house. This thing will be way to heavy to get into their basement by myself.

I went back down to the shop and finished the glueup on the apron. Final assembly is just a day or so away. I'll post once I start finishing.

As always, complete construction shots with captions are in my Latest Project Picasa Album.

Thanks for looking!

I'll have to give the shop a good cleanup before finishing. The flush trim bit made a mess. I'm really going to consider a Festool router. I'm getting tired of the mess. I have some Festool products on order. I hoped to give them a whirl before I get too carried away with going "green."

Monday, April 16, 2007

Entertainment Centre Part 2


I'm continuing with this project. All of the pieces are cut and assembled and ready for finish. I was debating a final assembly and then finish, but this is going to be heavy for just one person to move, so I'm going to finish it, then assemble it in place.

I spent some time with my new Dowelmax jig and have really enjoyed using it. It's so easy and so precise that you look for things to do with it. I should be able to start finishing this project this week. I have to fit a face frame and mill some trim, but it's got a couple of hours left of woodwork before it gets some color.

As always, captioned pictures of the construction process are in my Picasaweb Latest Project Album.

Friday, April 6, 2007

Entertainment Centre


I started an entertainment centre for my parents basement. Dad has a TV down there for when my mother uses her treadmill. It's sitting on a rickety table from the 60's and he wanted a new table. I thought, let's build one. He gave me a plan that would take me about 11 minutes to build and that I'd hate for a lifetime. I remembered an entertainment centre plan from Wood Magazine and went about searching for where the heck I put that issue. I found it. I'm building a version of this one.

I have an album at Picasaweb that follows the build of this project. The site has each photo captioned, so I won't repeat the text here.

If you want to take a look at the build in progress, please take a look at my Latest Project Album.

Wednesday, March 7, 2007

Wife's Bookcase


This was another, "Me and my big mouth," project. My wife moved into her new office and decided she needed a wall unit/bookcase. She was going to go to one of the box furniture stores and buy one. I said, "Why do that when I can make you one." I was thinking, "who said that?"

And thus the second bookcase project was underway. Apparently I had forgotten the first bookcase project. Luckily, this one was half the size. It was less than half the trouble, but ultimately appreciated less than half as much as the first one.

Suffice to say, it was fun making the doors. I like to make doors. The process appeals to me. S2S lumber, jointed and planed. Dimensioned and routered. Assembled and glued. There is something about doors that people look at when you make a project. It's like the dovetail drawer for some. They don't look at the smoothness of the finish, or the complexity of the joinery. The look at the drawers and the doors. It is apparently the only tricky part. Either that or they don't want to take a square and a tape measure and see if you are actually any good.

Anyway, no construction pics of this either. There is something about making bookcases that just makes me want to be done with them, remembering the outcome and not the process.

My wife picked the hardware on this case and it's really the nicest feature of the entire thing. Other than the skillfully made piece! ;) Here is a link to a bigger picture at picasaweb.